Easy Chocolate Bun Recipe: Cocoa & Sugar Glaze

- Time: Active 30 minutes, Passive 2 hours 13 mins, Total 2 hours 43 mins
- Flavor/Texture Hook: Velvety dark cocoa crumb with a shatter crisp sugar glaze.
- Perfect for: Decadent weekend brunch or a crowd-pleasing dessert.
- Mastering This Easy Chocolate Bun Recipe
- Science of Bread Structure
- Key Recipe Specifications
- Essential Ingredient Deep Dive
- Necessary Baking Tools
- Step by Step Baking Guide
- Troubleshooting Your Bake
- Recipe Scaling Procedures
- Myths Regarding Cocoa Bread
- Storage and Zero Waste
- Perfect Pairing Ideas
- Recipe FAQs
- 📝 Recipe Card
Mastering This Easy Chocolate Bun Recipe
The smell of cocoa and yeast proofing in a warm kitchen is my absolute favorite way to spend a Saturday. I remember the first time I tried making these, I was so worried the cocoa powder would make the dough too dry and crumbly.
I actually over kneaded that first batch until it felt like a workout, but the moment I pulled them out of the oven, the house smelled like a high end chocolatier. Even though they weren't perfect, that contrast of the dark, slightly bitter crust against the sweet, melting chocolate inside was a total win.
Since then, I’ve played with the hydration and the proofing times to make sure every bite is as light as air. This easy chocolate bun recipe is all about that beautiful tension between the earthy, deep notes of the cocoa and the sugary, sticky glaze we brush on at the very end.
We aren't just making bread here; we are building a texture profile that ranges from a soft, pillowy interior to a glossy, slightly tacky exterior that makes you want to lick your fingers.
We’ve all had those dry, dense rolls that require a gallon of milk to swallow, but that’s not what we’re doing today. By using Dutch processed cocoa and just the right amount of butter, we ensure a crumb that is almost fudge like in its richness without being heavy.
If you’ve been looking for a way to satisfy a serious sweet tooth while showing off some baking skills, you are in the right place. Let’s get our hands floury.
Science of Bread Structure
Starch Gelatinization: When the milk reaches the right temperature, it allows the starch in the flour to swell and trap moisture, resulting in a velvety crumb.
Osmotic Stress Management: The 70g of granulated sugar can actually slow down yeast, so we use instant yeast to ensure a steady rise despite the sugar content.
Dutch Process Neutralization: Dutch processed cocoa has a neutral pH, which prevents it from reacting negatively with the yeast and keeps the dough dark and flavorful.
Gluten Shortening: The 60g of unsalted butter coats the gluten strands, which prevents them from becoming too tough and keeps the buns tender.
| Method | Time | Texture | Best For |
|---|---|---|---|
| Standard Oven | 18 minutes | Evenly browned, light crust | Most home bakers |
| Dutch Oven (Stovetop) | 25 minutes | Dense, crusty bottom | Campfire or rustic baking |
| Air Fryer | 12 minutes | Very crisp exterior | Small batches (3-4 buns) |
Understanding the way heat moves through a cocoa based dough is essential because cocoa absorbs moisture differently than plain flour. If you are looking for a more traditional base, you might enjoy comparing this to a Sourdough Buns Recipe which relies on wild yeast for its lift.
Key Recipe Specifications
Component Analysis
| Ingredient | Science Role | Pro Secret |
|---|---|---|
| 500g All Purpose Flour | Provides the protein structure (gluten) for the rise. | Sift with cocoa powder to prevent tiny flour lumps in dark dough. |
| 7g Instant Yeast | Biological leavener that produces carbon dioxide. | Keep it away from direct contact with salt during the initial mix. |
| 40g Cocoa Powder | Adds flavor, color, and minor structural tannins. | Use Dutch processed for that deep, "Oreo black" color and smoother taste. |
| 60g Unsalted Butter | Softens the crumb and adds a rich mouthfeel. | Add it after the initial gluten has formed for better volume. |
When working with these ratios, the 250ml of whole milk is the engine that drives the hydration. It is just enough to keep the dough supple without it becoming a sticky mess on your counter.
Essential Ingredient Deep Dive
- 500g All Purpose Flour: The base of our structure. Why this? AP flour provides the perfect balance of softness and strength for sweet rolls.
- Substitute: Bread flour (adds more chewiness).
- 40g Dutch processed Cocoa Powder: For that intense chocolate flavor. Why this? It’s less acidic than natural cocoa, protecting the yeast's activity.
- Substitute: Natural cocoa powder (add a pinch of baking soda to neutralize).
- 7g Instant Yeast: Our lifting agent. Why this? No blooming required, which speeds up the process significantly.
- Substitute: 21g Fresh yeast.
- 70g Granulated Sugar: Provides sweetness and feeds the yeast. Why this? This amount creates a tender crumb without making it cloying.
- Substitute: Light brown sugar (adds a hint of molasses).
- 250ml Whole Milk: The primary liquid. Why this? The fat in whole milk creates a richer, more luxurious dough.
- Substitute: Oat milk (keeps it creamy while staying dairy-free).
- 60g Unsalted Butter: For the fat content. Why this? Softened butter incorporates smoothly into the developed dough.
- Substitute: Coconut oil (adds a slight tropical note).
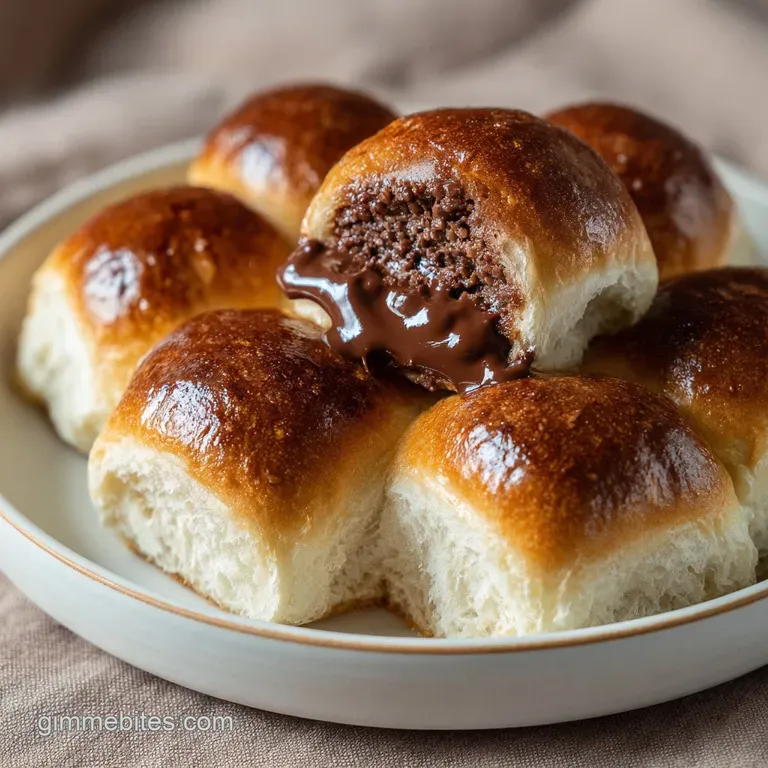
- 150g Semi sweet Chocolate Chunks: The molten surprise inside. Why this? Chunks hold their shape better than chips and offer bigger chocolate pools.
- Substitute: Dark chocolate bar, chopped roughly.
Chef's Tip: If you find yourself running low on snacks while the dough proofs, these Healthy Little Bites recipe are a great way to use up any leftover honey in the pantry.
Necessary Baking Tools
To get that "viral" bakery look, you really don't need much, but a few specific tools make it easier. A stand mixer is your best friend here because cocoa dough can be quite tacky, and the machine handles the 10 minute knead without breaking a sweat.
If you are doing this by hand, keep a bench scraper nearby to help manage the dough on the counter.
I also highly recommend using a digital scale. When we are dealing with 500g of flour and 40g of cocoa, being off by even a little bit can turn a "fluffy" bun into a "brick." A standard 9x13 inch (23x33 cm) baking pan works best for keeping the buns nestled together, which forces them to rise up rather than out, creating those beautiful pull apart edges.
step-by-step Baking Guide
Controlling the Bloom
- Warm the 250ml whole milk to exactly 38°C. Note: Too hot and you'll kill the yeast; too cold and they'll stay asleep.
- Whisk the dry base by combining 500g flour, 40g cocoa powder, 70g sugar, 7g yeast, and 5g salt in a large bowl.
- Combine the wet and dry ingredients by pouring the warm milk and the room temperature egg into the flour mixture.
Managing Gluten Tension
- Knead the mixture for about 5 minutes until a rough ball forms and pulls away from the sides.
- Incorporate the 60g softened butter one tablespoon at a time, kneading for another 5-7 minutes until the dough is silky, elastic, and glossy.
- Start the bulk proof by placing the dough in a greased bowl, covering it, and letting it rest for 1 hour 30 mins until it has doubled in size and looks puffy.
Shaping the Rolls
- Divide the dough into 12 equal portions (about 80-85g each) and flatten them into discs.
- Stuff the centers with the 150g chocolate chunks, pinching the seams tightly until the chocolate is fully enclosed in a taut ball.
- Begin the final proof by placing the rolls in a lined baking pan and letting them rise for 45 minutes until they are touching and look delicate.
- Bake the buns at 180°C for 18 minutes until the tops feel firm and the kitchen smells like brownies.
- Apply the finish by boiling the 2 tbsp sugar and 2 tbsp water, then brushing the hot syrup over the warm buns until they shine like glass.
Troubleshooting Your Bake
Preventing Dense Chocolate Buns
If your buns come out feeling like paperweights, it usually comes down to the temperature of your ingredients or the length of your proofing. Cocoa powder is quite heavy and can weigh down the gluten structure if the yeast isn't given a warm enough environment to work its magic.
| Problem | Root Cause | Solution |
|---|---|---|
| Dough won't rise | Milk was over 45°C | Start over; the heat likely killed the yeast. |
| Buns are dry | Too much flour used | Always measure by weight; 500g is the limit. |
| Chocolate leaked out | Seam was too thin | Ensure the "skin" of the dough is even before pinching. |
Always remember that dough is a living thing. If your kitchen is cold, that 1 hour 30 mins bulk proof might need to stretch to 2 hours. Trust your eyes more than the clock!
Common Mistakes Checklist ✓ Never skip sifting the cocoa powder; lumps will stay as bitter pockets in the finished bun. ✓ Wait until the dough has some gluten structure before adding the butter to ensure the best lift.
✓ Pinch the bottom seams of the buns aggressively to prevent a chocolate blowout in the oven. ✓ Apply the sugar syrup while the buns are still hot so it soaks in and creates that tacky glaze.
✓ Let the buns cool for at least 10 minutes before eating to let the internal chocolate set slightly.
Recipe Scaling Procedures
Scaling Down (Makes 6 Buns) To make a half batch, use 250g flour and 20g cocoa. For the egg, whisk one large egg in a small bowl and use exactly half of it by weight. Use a smaller 20cm square pan and check for doneness at 15 minutes.
Scaling Up (Makes 24 Buns) When doubling, keep the yeast at 12g rather than a full 14g to prevent an overly yeasty flavor. Use two separate 9x13 pans rather than one giant one to ensure the middle buns cook through. Increase the bake time by about 3-5 minutes if your oven is crowded.
Myths Regarding Cocoa Bread
One huge misconception is that you need special "bread cocoa" to make this work. In reality, standard grocery store Dutch processed cocoa works perfectly. Another myth is that you can't over proof chocolate dough because it's "heavy." Actually, over proofing will cause the structure to collapse in the oven, leaving you with flat, sad looking rolls.
Some people think adding more sugar makes the buns softer. While sugar does tenderize, adding too much will actually draw moisture out of the yeast cells via osmosis, effectively "pickling" your yeast and stopping the rise altogether. Stick to the 70g for the best results!
Storage and Zero Waste
Storage: These buns are best fresh, but they will stay soft for up to 3 days in an airtight container at room temperature. For longer storage, wrap them individually in plastic wrap and freeze for up to 2 months.
Reheating: To get that molten center back, microwave a single bun for 15 seconds or place in a 150°C oven for 5 minutes.
Zero Waste Tip: If you have buns that have gone slightly stale, don't toss them! They make an incredible chocolate bread pudding. Tear them into chunks, soak them in a custard of milk and eggs, and bake until set. You can even use leftover scraps of chocolate from this recipe to top a Cherries in the snow dessert for a bit of extra crunch.
Perfect Pairing Ideas
The Classic Morning Duo
Nothing beats a warm chocolate bun paired with a steaming cup of black coffee. The bitterness of the coffee cuts right through the richness of the cocoa dough and the sweet chocolate chunks. If you’re feeling extra, a glass of cold milk is the ultimate childhood throwback.
Decadent Brunch Spread
Serve these alongside a big bowl of fresh strawberries or raspberries. The acidity of the fruit balances the deep chocolate notes beautifully. If you want a full spread, these buns hold their own next to salty bacon or a savory omelet, though I’d probably skip the Turkey Jerky Recipe for this specific meal let's keep the focus on the sweets today!

Recipe FAQs
Can I use natural cocoa powder instead of Dutch processed cocoa?
No, it is better to stick with Dutch processed for this recipe. Natural cocoa is acidic and can react negatively with the yeast, resulting in a lighter color and less flavor depth.
How long should the bulk fermentation take for this high hydration dough?
Proof for 1 hour 30 minutes, or until doubled. Since cocoa adds weight, ensure the dough looks puffy and passes the poke test, even if it takes a little longer than scheduled.
How do I ensure the chocolate inside melts instead of burning or staying hard?
Use large chocolate chunks and pinch the dough seams tightly around them. Wrapping the chocolate completely prevents direct heat exposure and allows the interior to steam and melt during the 18-minute bake time.
Is it true that I must add the butter after the dough has already formed a rough ball?
Yes, you must add the butter after initial gluten formation. Adding the fat too early coats the flour proteins, which prevents strong gluten development and results in a denser, less voluminous bun structure.
How should I store leftover chocolate buns to keep them soft?
Store them airtight at room temperature for up to 3 days. The sugar syrup glaze helps retain moisture, but for best results, keep them sealed tightly to prevent the crumb from drying out.
What is the optimal oven temperature for achieving that shatter crisp glaze?
Bake the buns at 180°C, then immediately brush with hot sugar syrup. The syrup must be applied while the buns are still hot from the oven so it absorbs slightly and hardens into a glossy, tacky finish upon cooling.
What should I do if the dough is too sticky to handle during shaping?
Lightly dust your surface and hands with flour or use a bench scraper. Since this is a high hydration dough, resist the urge to add too much flour, which will negatively affect the light, cloud like texture.
Easy Cocoa Buns Recipe

Ingredients:
Instructions:
Nutrition Facts:
| Calories | 315 kcal |
|---|---|
| Protein | 7.2 g |
| Fat | 10.2 g |
| Carbs | 50.1 g |
| Fiber | 2.1 g |
| Sugar | 15.4 g |
| Sodium | 175 mg |
