Pickling Liquid Recipe: Bracing & Tangy
- Time: Active 5 mins, Passive 5 mins, Total 10 mins
- Flavor/Texture Hook: Bracing, tangy, and reliably crisp
- Perfect for: Beginner friendly meal prep and hearty sandwich toppings
- Crafting a Reliable Pickling Liquid Recipe at Home
- The Essential Chemistry Behind a Crisp Pickling Result
- Key Specifications for Successful Small Batch Quick Pickles
- Essential Pantry Staples for Your Brine Base
- The Basic Tools Required for Safe Home Pickling
- Simple Steps to Infuse Your Vegetables With Flavor
- Expert Solutions for Common Brining and Texture Issues
- Easy Ingredient Adjustments for Personalized Flavor Profiles
- Debunking Common Preservation Misconceptions
- Reliable Storage Guidelines and Creative Brine Reuse Ideas
- Hearty Dishes That Pair With These Bright Flavors
- Recipe FAQs
- 📝 Recipe Card
Crafting a Reliable Pickling Liquid Recipe at Home
The sharp, bracing scent of vinegar hitting a hot pan always takes me back to my grandmother's kitchen on humid July afternoons. I remember the rhythmic "clink clink" of her metal spoon against glass jars as she prepped what she called her "icebox treats." She never used a fancy kit, just a reliable blue speckled pot and a handful of staples from the pantry.
Getting that first bite right is all about the balance between the pucker and the crunch. I once made the mistake of using standard table salt in a hurry, and the result was a murky, grey mess that looked more like a science experiment than a snack.
It taught me that while this process is simple, the details really do matter if you want that clear, bright finish.
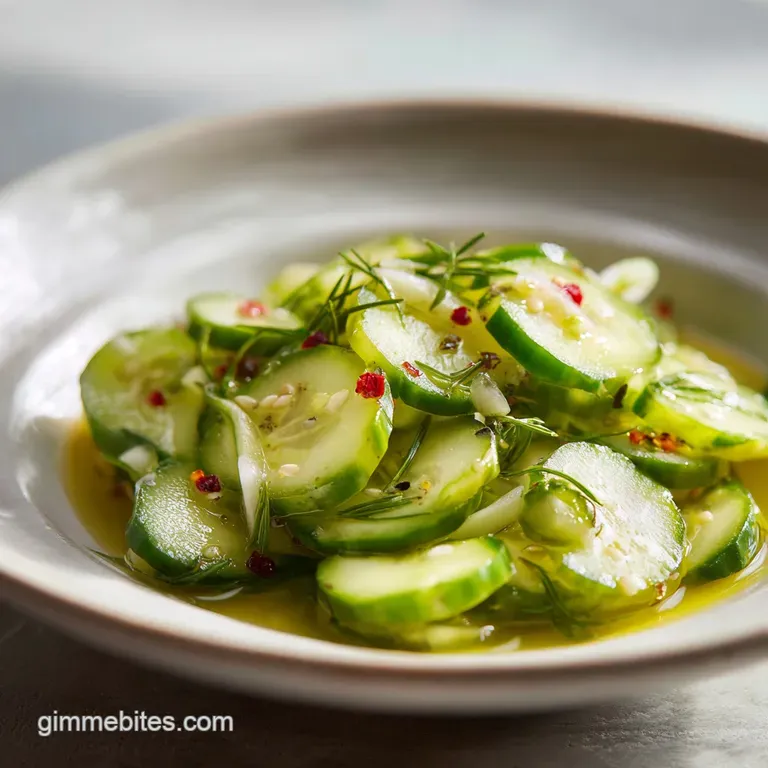
We are going for a hearty, traditional brine today that works for almost anything you have in the crisper drawer. Whether you are dealing with a surplus of cucumbers or some stray red onions, this pickling liquid recipe provides the steady foundation you need for consistent results every time.
Let's get the stove going and transform those veggies into something special.
The Essential Chemistry Behind a Crisp Pickling Result
- The Osmotic Shift: Salt draws internal moisture out of vegetable cell walls, allowing the seasoned brine to move in and create a firm, satisfying snap.
- The Acidity Barrier: Using vinegar with exactly 5% acidity ensures the pH level drops low enough to safely preserve the food and prevent spoilage.
- Thermal Infusion: Heating the liquid just until the solids dissolve ensures the aromatics like garlic and mustard seeds bloom without cooking the vegetables.
| Vegetable Thickness | Brine Temperature | Cooling Time | Visual Finish |
|---|---|---|---|
| Thin Slices (3mm) | Room Temp | 30 minutes | Slightly translucent |
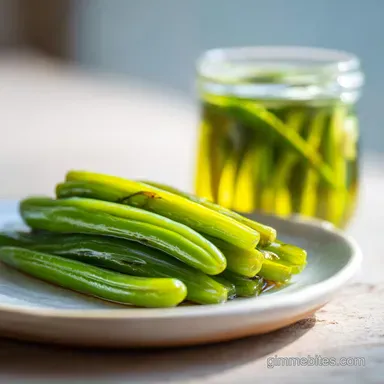
| Thick Spears (2cm) | Simmering | 2 hours | Bright and vibrant |
| Whole Small Peppers | Boiling | 4 hours | Softened but intact |
Choosing the right approach depends entirely on how much bite you want in your final product. For a quicker result similar to my Pickle De Gallo recipe, thinner slices are your best friend because they absorb the flavors almost instantly.
Key Specifications for Successful Small Batch Quick Pickles
This batch is designed to be manageable for a single large jar or two smaller ones, making it a reliable choice for a quick kitchen win. We are sticking to a 1:1 ratio of water to vinegar, which is the gold standard for a balanced, all purpose brine.
| Method | Total Time | Final Texture | Best Use |
|---|---|---|---|
| Quick Fridge | 10 minutes | Very Crunchy | Sandwiches |
| Classic Boiled | 45 minutes | Medium Snap | Side Dishes |
It is important to remember that this specific version is a "quick pickle" or "fridge pickle" style. While it uses the same high-quality ingredients as a pickling liquid recipe for canning, we aren't processing these jars in a water bath for long term shelf storage.
Essential Pantry Staples for Your Brine Base
| Ingredient | Science Role | Pro Secret |
|---|---|---|
| White Vinegar | Main Acidifier | Always check for 5% acidity on the label |
| Pickling Salt | Flavor & Clarity | Lacks anti caking agents to keep brine clear |
| Granulated Sugar | Flavor Balancer | Rounds out the sharp vinegar edge without being sweet |
- 1 cup white distilled vinegar (5% acidity): The backbone of the brine. Why this? Provides the necessary acid punch for safety and flavor.
- Substitute: Apple cider vinegar (adds a fruitier, mellow tone).
- 1 cup filtered water: Dilutes the acid to a palatable level. Why this? Filtered water prevents chlorine flavors from interfering with the aromatics.
- Substitute: Distilled water.
- 1 tbsp pickling salt: Seasons the vegetables deeply. Why this? Dissolves instantly and keeps the liquid crystal clear.
- Substitute: Kosher salt (use 1.5 tbsp as it is less dense).
- 1 tbsp granulated sugar: Acts as a bridge between the salt and acid. Why this? It doesn't make it sweet; it just tames the vinegar's harshness.
- Substitute: Honey (adds a floral note but may cloud the brine).
- 2 cloves garlic, smashed: Provides a hearty, savory base.
- 1 tsp whole black peppercorns: Adds a subtle, woody heat.
- 1 tsp yellow mustard seeds: Gives that classic "dill pickle" aroma.
- 0.5 tsp red pepper flakes: Adds a tiny hum of warmth.
- 2 sprigs fresh dill: The essential herb for that traditional garden flavor.
The Basic Tools Required for Safe Home Pickling
1. Non Reactive Saucepan
You need a stainless steel or enamel coated pot for this. Avoid aluminum or unlined copper, as the high acid content in the vinegar will react with the metal, giving your brine a metallic, "tinny" taste that is impossible to fix.
2. Heat Safe Glass Jars
Wide mouth Mason jars are the most reliable option here. They can handle the temperature shock of hot liquid and have a non porous surface that won't absorb old smells. Make sure they are scrubbed clean with hot soapy water before you start.
Simple Steps to Infuse Your Vegetables With Flavor

- Place the vinegar, water, pickling salt, and sugar into your saucepan. Note: This creates your base liquid ratio.
- Set the heat to medium and stir until the salt and sugar grains completely disappear.
- Add the smashed garlic, peppercorns, mustard seeds, and red pepper flakes to the pot.
- Bring the mixture to a bare simmer for about 2 minutes until the aroma of garlic fills the room.
- Remove the pan from the heat and let it sit for a moment. Note: This allows the spices to "bloom" in the hot liquid.
- Pack your prepared vegetables tightly into a clean glass jar, tucking the dill sprigs down the sides.
- Pour the hot pickling liquid recipe over the vegetables until they are fully submerged by at least 1cm.
- Tap the jar gently on the counter to release any trapped air bubbles.
- Allow the jar to sit on the counter until the glass is cool to the touch.
- Seal the lid tightly and move the jar into the refrigerator for at least 24 hours.
Expert Solutions for Common Brining and Texture Issues
1. Troubleshooting Brine Cloudiness
If your liquid looks milky or dull after a day, it usually comes down to the salt. Standard table salt contains anti caking agents like calcium silicate which don't dissolve, leaving a sediment. While it is safe to eat, it doesn't look very appetizing.
Using a dedicated pickling salt or a pure kosher salt ensures that sparkling clear finish we all want.
2. Resolving Vegetable Softness
Nothing is more disappointing than a mushy pickle. This often happens if the vegetables were slightly older or if the brine was poured on while boiling hot for very delicate items.
To keep things hearty and firm, try adding a grape leaf or a pinch of loose black tea leaves to the jar; the tannins help keep the cell walls strong.
| Problem | Root Cause | Solution |
|---|---|---|
| Bitter Aftertaste | Over boiled spices | Simmer aromatics for max 2 minutes only |
| Hollow Pickles | Internal air pockets | Slice vegetables or poke small holes in whole skins |
| Excessively Salty | Low water ratio | Stick to the 1:1 ratio and measure salt carefully |
Common Mistakes Checklist
- ✓ Ensure you use vinegar with at least 5% acidity for safety.
- ✓ Never use "light" or "low sodium" salt for this process.
- ✓ Scrub your vegetables thoroughly to remove any soil bacteria.
- ✓ Leave about 1cm of headspace at the top of the jar.
- ✓ Wait at least 24 hours before tasting for the best flavor.
Easy Ingredient Adjustments for Personalized Flavor Profiles
Scaling this recipe is quite simple because it relies on a basic ratio. If you want to make a larger batch for a family gathering, you can double or triple the ingredients easily. Just remember that when you scale up the spices, you don't always need a linear increase.
For a double batch, use 1.5 times the red pepper flakes so the heat doesn't become overwhelming.
If you are cutting the recipe in half for a single small jar, use half an egg's worth of spices if they are hard to measure, or just a generous pinch. When scaling down, the brine cools much faster, so you might need to keep it on the heat an extra minute to ensure the garlic is fully infused.
This pickling liquid recipe for cucumbers is very forgiving as long as the liquid ratio stays the same.
For those who prefer a sweet pickling liquid recipe, you can increase the sugar to 3 or 4 tablespoons. This creates a "bread and butter" style brine that pairs beautifully with salty snacks like a Turkey Jerky Recipe.
| Original Ingredient | Substitute | Why It Works |
|---|---|---|
| White Vinegar (1 cup) | Rice Vinegar (1 cup) | Milder, slightly sweeter acid profile. Note: Ensure it is at least 4.5-5% acidity |
Debunking Common Preservation Misconceptions
One major myth is that the brine must be boiling when it hits the vegetables to "cook" them. In reality, pouring boiling liquid over delicate veggies like cucumbers often leads to a soft, limp texture.
A hot, simmering brine is usually enough to kill surface bacteria while keeping the vegetable's structural integrity intact.
Another common belief is that you can use any salt you have on hand. As we discussed earlier, the minerals and additives in sea salt or table salt can drastically change the color and clarity of your brine. Stick to the basics for that professional, clear look. Finally, don't believe that "more is better" with spices.
Too many cloves or too much dill can turn the brine bitter over time as they sit in the jar.
Reliable Storage Guidelines and Creative Brine Reuse Ideas
These quick pickles should live in the back of your fridge, where the temperature is most consistent. They will stay hearty and safe to eat for up to 2 weeks. After that, the vegetables may start to lose their characteristic snap, though they are still fine for chopped relishes.
I don't recommend freezing these, as the ice crystals will destroy the cell walls, leaving you with a soggy mess once thawed.
Don't you dare pour that leftover liquid down the drain once the vegetables are gone! That "gold" is packed with flavor. I love using a splash of it to brighten up a potato salad or as a secret ingredient in a chicken marinade.
The acidity helps tenderize the meat while the dill and garlic add a massive flavor boost with zero extra effort.
Hearty Dishes That Pair With These Bright Flavors
These pickles are the perfect acidic counterpoint to rich, heavy meals. I always serve a side of these with a thick, juicy burger or a heavy grilled cheese sandwich. The sharpness of the vinegar cuts right through the fat, refreshing your palate between every bite.
If you are planning a Sunday roast, these work beautifully alongside a Braised Mock Tenderloin recipe. The bright pop of the pickled garlic and dill balances the deep, savory notes of the slow cooked beef. They also make a fantastic addition to a charcuterie board, sitting right next to some sharp cheddar and smoky ham. It is that reliable, stick to your ribs kind of accompaniment that every home cook should have in their back pocket.

Recipe FAQs
What is the 3/2:1 rule for pickling?
No, this is not a standard industry rule. The standard reference is a ratio based formula focusing on liquid balance, often simplifying to a 1:1 water to vinegar volume. Focus instead on maintaining a minimum of 5% acidity for safety.
What is the basic pickling formula?
The simplest reliable base is a 1:1 ratio of water to vinegar. This ratio must be combined with salt (usually 1 tablespoon per 1 cup of liquid) to create a safe and balanced brine for quick pickling.
How do you make pickling liquid?
Combine vinegar, water, salt, and sugar in a saucepan. Heat and stir until all solids dissolve completely, then steep your aromatics like garlic and peppercorns in the hot mixture for a few minutes before pouring over packed vegetables.
How to make your own pickling solution?
Measure 1 part white vinegar (5% acidity) and 1 part filtered water. Add 1 tablespoon of pickling salt and 1 tablespoon of sugar for every 2 cups of total liquid, then gently simmer until clear.
Is it true you must use pickling salt and not regular table salt?
No, using table salt is strongly discouraged for clarity. Table salt contains anti caking agents that will dissolve into your brine, causing it to become cloudy or murky over time.
Should I boil the vegetables in the brine for best texture?
No, boiling the vegetables often results in a soft, mushy texture. Pour the hot brine over raw, packed vegetables instead; the heat tempers them slightly while preserving the essential crunch, similar to the quick infusion method we use in our Orange Marmalade Chicken recipe.
Can I reuse pickling liquid from a finished jar?
Yes, you can safely reuse the liquid for quick pickles within a week. The used brine is excellent for boosting flavor in other dishes; splash it into marinades or use it to thin out richer sauces for a tangy lift.
Foolproof Pickling Liquid Recipe
Ingredients:
Instructions:
Nutrition Facts:
| Calories | 8 kcal |
|---|---|
| Protein | 0.1 g |
| Fat | 0.1 g |
| Carbs | 1.1 g |
| Fiber | 0.1 g |
| Sugar | 0.8 g |
| Sodium | 438 mg |
