Pie Iron Recipe with Ham and Cheese

- A Hearty Pie Iron Recipe with Ham
- Thermal Synergy for a Shattering Golden Crust
- Precise Measurements for This Campfire Favorite
- The Hearty Ingredients and Reliable Substitutes
- Necessary Tools for the Best Campfire Bake
- From Hot Coals to Your Plate
- Solving Common Campfire Iron Cooking Mistakes
- Scaling the Recipe for Your Whole Crew
- Flavorful Twists on This Reliable Classic
- Storage and Reducing Your Kitchen Waste
- Serving Suggestions for Your Outdoor Meal
- Critical High in Sodium
- Recipe FAQs
- 📝 Recipe Card
A Hearty Pie Iron Recipe with Ham
The sharp crackle of dry pine catching fire is usually my signal to start prepping. There is something about the way a cast iron press hisses when it touches a hot coal that makes my stomach growl instantly.
I remember the first time I tried this; I was convinced the apple slices would be a weird addition, but that first bite changed everything. The fruit softens just enough to release its juice, cutting right through the salty richness of the ham.
This simple Pie Iron Recipe with Ham and Cheese creates a warm, melty sandwich perfect for camping. We've spent many nights huddled around a fire, waiting for that specific woody aroma to signal that the bread has turned into a golden, toasted shell.
It is the ultimate comfort food for when the sun goes down and the air gets a bit nippy. Trust me, once you see that cheese oozing out the sides, you'll never go back to cold sandwiches again.
Right then, let's get into what actually makes this work. We aren't just making a sandwich; we're using a portable oven to create a pressurized, toasted pocket of flavor. It’s reliable, it’s filling, and it’s become a mandatory part of our family camping tradition.
Whether you call them pudgy pies, hobo sliders, or mountain pies, the result is always the same: a hot, stick to your ribs meal that beats any freeze dried pack you've ever tasted.
Thermal Synergy for a Shattering Golden Crust
Conductive Saturation: The heavy cast iron serves as a thermal battery, transferring intense, direct heat that triggers the Maillard reaction across every millimeter of the bread's surface.
This pressure sealing method traps internal steam, which par cooks the apple slices while simultaneously melting the cheddar into the ham’s crevices.
| Thickness of Sandwich | Internal Finish | Rest Time | Visual Cue |
|---|---|---|---|
| 1.5 inches | Steaming hot | 2 minutes | Golden brown exterior |
| 2 inches | Melted through | 3 minutes | Deep mahogany crust |
| 1 inch | Quick crisp | 1 minute | Light toasted amber |
Cooking over an open flame can be unpredictable, but the heavy iron walls of your cooker act as a buffer. This means even if your fire is a bit temperamental, the sandwich inside receives a steady flow of heat.
It is vital to let the iron preheat for at least two minutes before you even think about putting the bread in; a cold iron leads to a soggy, pale sandwich that sticks to the metal.
Precise Measurements for This Campfire Favorite
We aren't just throwing things together here; the ratio of acid from the mustard to the sweetness of the apple is what makes this Pie Iron Recipe with Ham and Cheese stand out. Using extra lean deli ham ensures you get plenty of protein without the sandwich becoming a greasy mess in the middle of the woods.
| Component | Role in the Build | Pro Secret |
|---|---|---|
| Sprouted Grain Bread | Structural integrity | Use thick slices to prevent the iron from crushing the crumb too thin. |
| Extra Lean Deli Ham | Lean protein base | Fold the slices instead of laying them flat to create air pockets for heat. |
| Sharp White Cheddar | The "glue" | Grating the cheese yourself helps it melt faster than pre sliced versions. |
| Granny Smith Apple | Acid and crunch | Slice paper thin so they soften in the short seven minute cook time. |
The choice of bread matters more than you’d think. While a standard white loaf works, a sturdy sourdough or sprouted grain bread provides a more satisfying "shatter" when you bite into it. If you’re prepping at home before heading to the woods, you could even use leftovers from a Braised Mock Tenderloin recipe if you want a beefier version, though the ham is the classic choice for a reason.
The Hearty Ingredients and Reliable Substitutes
For this Recipe with Ham and Cheese, sticking to high-quality fats and sharp flavors pays off. Every ingredient in this list serves a purpose, from the structural base to the final zesty kick of the mustard.
- 2 slices Sprouted grain bread or sourdough: Why this? Provides a sturdy structure that won't fall apart under the iron's pressure.
- Substitute: Standard whole wheat bread (yields a softer, less crispy crust).
- 1 tsp Light grass fed butter: Why this? Creates that iconic golden brown sheen and prevents sticking.
- Substitute: Ghee or coconut oil (gives a higher smoke point for hotter fires).
- 3 oz Extra lean deli ham (97% fat free): Why this? Keeps the meal hearty without adding excess liquid or grease.
- Substitute: Smoked turkey breast (lighter flavor profile, similar texture).
- 1 slice Sharp White Cheddar cheese: Why this? Offers a punchy flavor that stands up to the smoky fire.
- Substitute: Swiss cheese (milder, nuttier taste with a great stretch).
- 1 tsp Dijon mustard: Why this? The vinegar cuts through the richness of the cheese and ham.
- Substitute: Stone ground mustard (adds more texture and a rustic feel).
- 4 thin slices Granny Smith apple: Why this? Adds a bright, tart contrast to the savory elements.
- Substitute: Bosc pear slices (sweeter and softer, pairs well with ham).
Necessary Tools for the Best Campfire Bake
You don't need a whole kitchen, but you do need the right heavy duty gear. This isn't the place for thin, flimsy sandwich makers; you want something that can handle being shoved directly into a pile of glowing coals.
- Cast Iron Pie Iron: Look for a square or round model with long handles to keep your hands away from the heat.
- Heat Resistant Gloves: Essential for handling the latch and moving the iron safely.
- Butter Knife or Offset Spatula: For getting that butter edge to edge on the bread.
- A Solid Cutting Board: To prep your apple slices and assembly.
Chef's Tip: Rub a cut clove of garlic onto the inside of the hot iron before you add the butter. It seasons the metal and adds a subtle, savory depth to the bread's crust that you just can't get any other way.
From Hot Coals to Your Plate
Let's crack on with the actual assembly. Precision here prevents a mess later. You want the ingredients centered so the iron can create a proper seal around the edges of the bread.
- Preheat the iron. Place your empty pie iron in the coals for 2 minutes until it's hot enough to sizzle a drop of water.
- Butter the bread. Spread the butter evenly on one side of each slice. Note: This side goes against the metal.
- Apply the base. Spread the Dijon mustard on the non buttered side of one slice.
- Layer the ham. Fold the 3 oz of ham into the center of the mustard covered slice.
- Add the crunch. Place the 4 apple slices directly on top of the ham.
- Top with cheese. Lay the sharp white cheddar over the apples to act as a melty sealant.
- Close the build. Place the second slice of bread on top, buttered side facing up.
- Secure the iron. Close the pie iron and latch it shut. Trim any excess bread sticking out to prevent it from burning.
- Cook over coals. Place the iron directly on hot coals (avoid high flames) for 3-4 minutes per side.
- Check for doneness. Carefully open the iron; it’s ready when the exterior is a deep, crackling golden brown.
Solving Common Campfire Iron Cooking Mistakes
The biggest hurdle with a Pie Iron Recipe with Ham is heat management. It is very easy to go from "not ready" to "charcoal" in thirty seconds if you aren't paying attention.
Why Your Sandwich is Burnt on the Outside
If your bread is black but the cheese inside is still a cold slab, your fire is too aggressive. Direct flames are the enemy; you want the glowing, pulsing red of a coal bed. This provides a steady, radiant heat that penetrates the iron without scorching the surface.
Why Your Bread Sticks to the Metal
This usually happens for two reasons: a cold iron or insufficient fat. Make sure you aren't skipping the preheating step, and ensure your butter goes all the way to the very edges of the bread.
| Problem | Root Cause | Solution |
|---|---|---|
| Saturated, soggy bread | Too much moisture in the ham or apple | Pat the ham dry with a paper towel before assembling. |
| Cheese hasn't melted | Sandwich is too thick | Press the iron firmly or grate the cheese for faster heat absorption. |
| Uneven browning | Iron was only on one side of the coal | Flip the iron every 2 minutes for consistent thermal distribution. |
Cooking with Ham and Cheese requires a bit of intuition. If you hear a loud, aggressive sizzle, the iron is likely too hot. You want a gentle, rhythmic hiss that tells you the moisture is slowly evaporating and the sugars in the bread are caramelizing.
Common Mistakes Checklist: ✓ Never place the iron directly into a roaring yellow flame; use the red coals instead. ✓ Don't overfill the sandwich; if the iron won't latch easily, remove a slice of ham.
✓ Always trim the crusts if they hang out of the iron, or they will catch fire and ruin the flavor. ✓ Let the sandwich rest for two minutes after cooking so the cheese sets and doesn't run out.
Scaling the Recipe for Your Whole Crew
When you're feeding a family, one iron usually isn't enough. If you are cooking for four, it’s best to have at least two irons going at once. You can prep all the sandwiches ahead of time on a clean tray, keeping them covered so the bread doesn't dry out.
If you need to scale this up for a big group, keep your ingredients in a cooler but bring the cheese to room temperature about 15 minutes before cooking. This ensures a faster melt. For those who prefer a softer bite or are feeding kids who aren't fans of sourdough, try using a Sourdough Buns Recipe instead of sliced bread. You’ll just need to press down a bit firmer to get that seal.
| Group Size | Iron Count | Prep Time | Total Time |
|---|---|---|---|
| 1 Person | 1 Iron | 5 minutes | 12 minutes |
| 4 People | 2 Irons | 10 minutes | 25 minutes |
| 8 People | 4 Irons | 15 minutes | 35 minutes |
Flavorful Twists on This Reliable Classic
Once you've mastered the basic with Ham and Cheese, you can start getting creative with what's in your cooler. The beauty of the pie iron is its versatility.
- The Spicy Kick: Add a few pickled jalapeños or swap the Dijon for a spicy habanero mustard.
- The Mediterranean: Use feta instead of cheddar and add a leaf of fresh spinach and a sun dried tomato.
- The Sweet Heat: Drizzle a tiny bit of honey over the apples before closing the sandwich.
- The Breakfast Version: Swap the ham for cooked bacon and add a pre fried egg inside the pocket.
For another quick snack that doesn't require a full kitchen, you might like an Edible Cookie Dough recipe to enjoy while you wait for the fire to die down to the perfect coal bed. It’s a great way to keep the "hangry" campers at bay.
Storage and Reducing Your Kitchen Waste
Because this Pie Iron Recipe with Ham is best served piping hot, I don't recommend making them in advance to eat cold. However, you can certainly prep the components.
Storage: Keep your sliced apples in a bag with a squeeze of lemon juice to prevent browning for up to 24 hours. The ham and cheese should stay in the cooler until the moment of assembly.
If you do have a leftover cooked sandwich, wrap it tightly in foil; it can be reheated on the edge of the fire the next morning for 3-4 minutes.
Zero Waste: Don't throw away those trimmed bread crusts! Toss them in a pan with a little butter and cinnamon sugar for a quick "campfire crouton" snack, or save them in a bag to feed the birds (if allowed in your area).
If you have extra apple slices, they are excellent when charred directly on the iron for a minute as a healthy dessert.
Serving Suggestions for Your Outdoor Meal
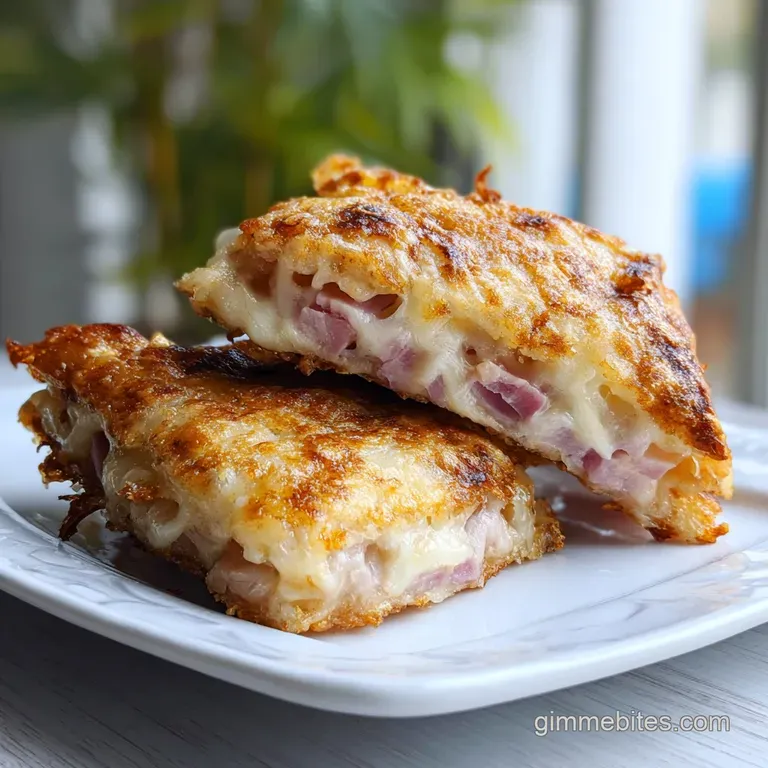
Presentation might seem silly in the woods, but a little effort goes a long way. I like to slice these on a diagonal so you can see the layers of pink ham, melted white cheese, and green apple. It’s visually much more appealing than a closed pocket.
Pair this hearty sandwich with a simple bag of kettle chips or a cup of hot tomato soup. The soup is especially good for dipping those crispy, buttered edges. If you're looking for something more substantial to serve alongside it, a cold potato salad provides a nice temperature contrast to the steaming hot sandwich.
Enjoying this Recipe with Ham is all about the environment. Sit back on your camp chair, listen to the woods, and take your time. There is no rush when you're cooking over coals. The best part of this meal isn't just the velvety cheese or the salty ham; it's the fact that you made it yourself, outdoors, with nothing but a few simple ingredients and a hot fire.
That’s what I call a reliable success.

Critical High in Sodium
1245 mg of sodium per serving (54% of daily value)
The American Heart Association recommends limiting sodium intake to 2,300mg per day.
Tips to Reduce Sodium
-
Low-Sodium Ham-25%
Replace the extra lean deli ham with a lower sodium ham option. Look for products labeled 'low sodium' or 'reduced sodium,' and compare nutrition labels to choose the option with the least amount of sodium.
-
Lower Sodium Cheese-15%
Opt for a lower sodium cheese variety. Swiss cheese or fresh mozzarella have significantly less sodium than sharp cheddar. Alternatively, use half the amount of cheddar or find a reduced sodium cheddar.
-
Unsalted Bread-10%
While sprouted grain and sourdough are healthier, look for unsalted versions of these breads. Some breads can be surprisingly high in sodium.
-
Mustard Swap-10%
Dijon mustard can be high in sodium. Try using a lower sodium mustard option or use a smaller amount. Alternatively, try a small amount of honey for some sweetness.
-
More Apple Slices-5%
Increase the apple slices to 6-8. Adding more apple slices can enhance the flavor and sweetness, reducing the need for sodium rich ingredients.
-
Herbs & Spices
Enhance the flavor with fresh herbs and spices like black pepper, or garlic powder. These additions can make your sandwich more flavorful without adding any sodium.
Recipe FAQs
Should I use pre-sliced cheese for the best melt?
No, grating your own cheese is better. Grated cheese has more surface area, allowing it to melt significantly faster and more evenly inside the sealed iron pocket.
How long should I cook the ham and cheese pie iron sandwich?
Cook for 3 to 4 minutes per side. Place the iron directly on glowing red coals, avoiding high flames, and flip consistently for even browning.
How to prevent the bread from sticking to the cast iron?
Ensure the iron is fully preheated before assembly. Butter the bread completely, ensuring the fat reaches the edges, and never skip this step.
Is it necessary to trim the bread before cooking?
Yes, trim any excess bread hanging out. Overhanging bread will catch direct heat, burn quickly, and taint the flavor of the sandwich inside the sealed pocket.
Can I use frozen ham instead of deli ham?
No, stick with thawed or refrigerated ham. Frozen meat will release excessive moisture during the short cooking time, leading to a soggy interior.
What is the purpose of including thin apple slices?
The apples provide necessary acid and contrast. Their tartness cuts through the richness of the ham and melted cheddar, balancing the savory flavor profile.
Can I reheat a leftover cooked pie iron sandwich?
Yes, reheat it cautiously near the embers. Wrap the leftover sandwich tightly in foil and place it near the edge of the fire bed for about 3 to 4 minutes.
Ham Pie Iron Sandwich Recipe

Ingredients:
Instructions:
Nutrition Facts:
| Calories | 506 kcal |
|---|---|
| Protein | 30.4 g |
| Fat | 17.1 g |
| Carbs | 54.2 g |
| Fiber | 6.2 g |
| Sugar | 4.8 g |
| Sodium | 1245 mg |
