Easy Ice Cream Cake Recipe with Chocolate
- Time: 30 min active + 6 hrs chilling = Total 7 hours
- Flavor/Texture Hook: Velvety ice cream meets a shatter crisp wafer layer and a moist chocolate base
- Perfect for: Birthday parties, summer bashes, or when you just need a serious sugar rush
The Best Easy Ice Cream Cake Recipe
The smell of melting cocoa hitting a hot oven is honestly the best part of my day. There is something about that deep, chocolatey aroma that just screams "celebration" before the cake even leaves the pan.
I remember the first time I tried to make one of these for a friend's birthday, and I totally skipped the cooling step for the base. The result? A gooey, melted mess that looked more like a chocolate soup than a cake. I learned the hard way that patience is the only ingredient you can't buy at the store.
Learn how to make the ultimate Easy Ice Cream Cake Recipe with Chocolate. We are talking about a towering dessert that looks like it came from a high end bakery but uses a few clever shortcuts to keep things stress free.
This is all about building those layers of flavor, from the dense cake bottom to the light as-air whipped topping.
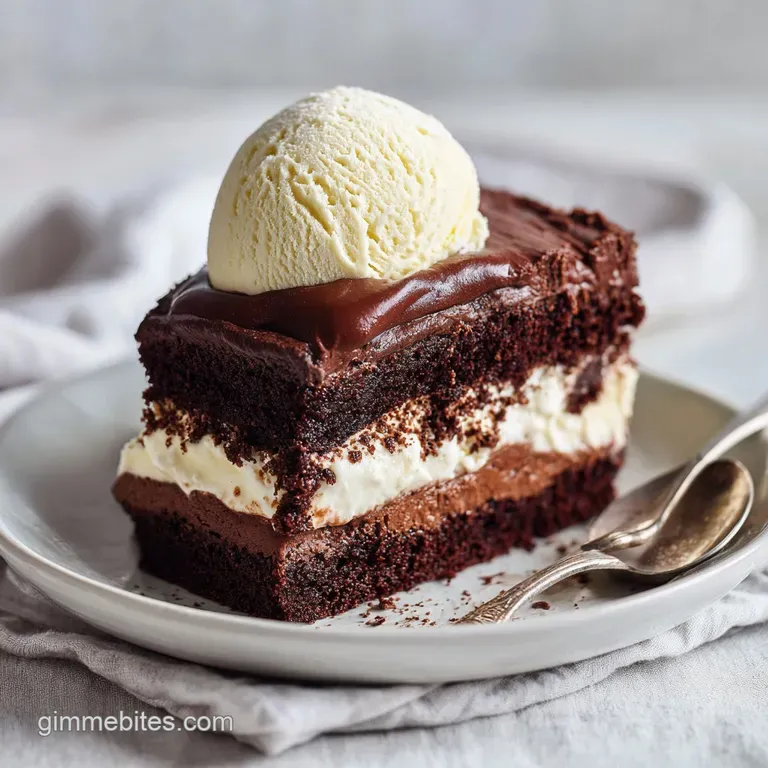
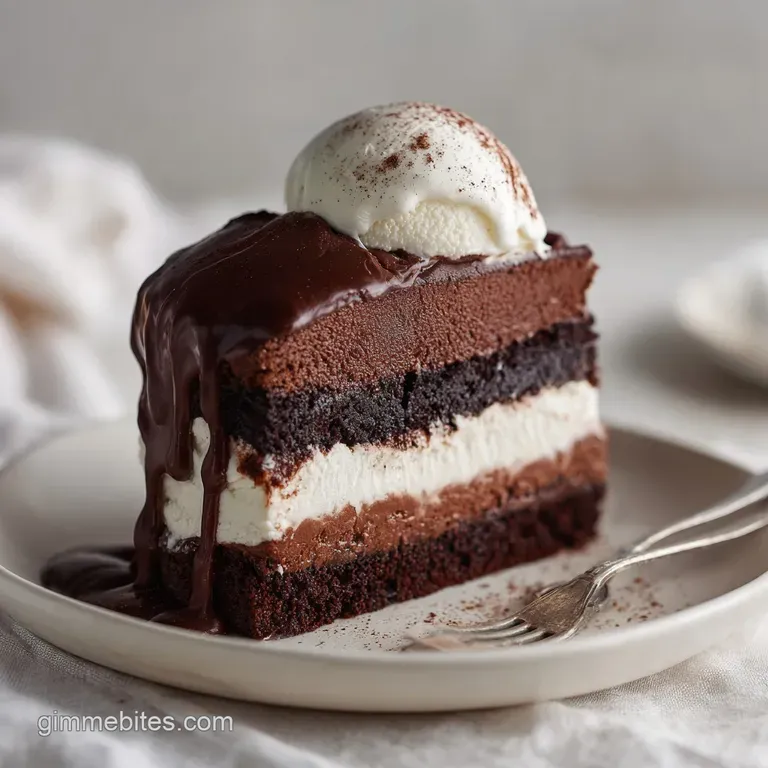
You can expect a dessert that hits every single texture note. You get the soft crumb of the cake, the freezing chill of the ice cream, and the surprising crunch of chocolate wafers. It's a total crowd pleaser that doesn't require you to be a pastry chef to pull off. Let's crack on and get this thing in the freezer.
Why These Layers Actually Work
I've always wondered why some ice cream cakes turn into a brick while others stay creamy. It's all about how the ingredients interact at different temperatures.
- Temperature Barrier: Cooling the cake base completely prevents the ice cream from melting upon contact, which keeps the layers distinct.
- Texture Contrast: Adding crushed wafers creates a "crunch zone" that prevents the two ice cream flavors from just merging into one blurry taste.
- Fat Stability: The high fat content in heavy whipping cream allows it to hold stiff peaks, acting as a velvety insulator for the frozen layers.
- Moisture Balance: Using a cake mix with oil ensures the base stays moist even after being frozen, so it doesn't taste like a dry cracker.
| Method | Time | Texture | Best For |
|---|---|---|---|
| store-bought | 5 mins | Often icy/artificial | Last minute emergencies |
| From Scratch | 8+ hours | Rich, velvety, custom | Special occasions |
| This Shortcut | 7 hours | Fudgy and creamy | High impact, low stress |
The Full Recipe Specs
Before we dive into the gear, we need to talk about the "why" behind the ingredients. I don't just throw things in a bowl; I want to know why they are there.
| Ingredient | Science Role | Pro Secret |
|---|---|---|
| Chocolate Cake Mix | Structure/Base | Add a pinch of espresso powder to make the chocolate pop |
| Heavy Cream | Aeration/Topping | Keep it ice cold for the fastest whip |
| Chocolate Wafers | Texture Break | Chill them before crushing for cleaner shards |
| Ice Cream | Core Volume | Let it sit at room temp for 5 mins for easier spreading |
The Essential Building Blocks
Right then, let's get the shopping list sorted. I've stuck to the essentials here, but I'll give you some swaps if you're missing something.
- 1 box (15.25 oz) chocolate cake mix Why this? Ensures a consistent, moist crumb every time
- 1 cup water
- 1/2 cup vegetable oil Why this? Keeps the cake from drying out in the freezer
- 3 large eggs
- 1.5 quarts chocolate ice cream
- 1.5 quarts vanilla ice cream
- 1 cup crushed chocolate wafers Why this? Provides that necessary "shatter" texture
- 2 cups heavy whipping cream Why this? Essential for the stable, airy topping
- 1/2 cup powdered sugar
- 1 tsp vanilla extract
| Original Ingredient | Substitute | Why It Works |
|---|---|---|
| Heavy Cream (2 cups) | Coconut Cream (chilled, 2 cups) | Similar fat content. Note: Adds a coconut flavor and a slightly denser peak |
| Vegetable Oil (1/2 cup) | Melted Butter (1/2 cup) | Adds richness. Note: The cake will be slightly denser and more buttery |
| Chocolate Wafers (1 cup) | Crushed Oreos (1 cup) | Similar crunch and flavor. Note: The cream filling adds extra sweetness |
If you're looking for other ways to satisfy a sweet tooth, you might love my Non Cook Cookie Dough for a quick snack between baking sessions.
Must Have Kitchen Gear
You don't need a professional studio, but a few specific tools make this a breeze.
- 9 inch springform pan (absolutely mandatory for getting the cake out without it collapsing)
- Parchment paper (to line the bottom)
- Offset spatula (for those smooth, velvety layers)
- Electric hand mixer or stand mixer (like a KitchenAid)
- Mixing bowls
Step-by-step Assembly Guide
Now we get to the fun part. Follow these steps closely, and you'll have a showstopper on your hands.
- Preheat your oven to 350°F (175°C). Grease your 9 inch springform pan and line the bottom with parchment paper Note: This is your insurance policy against the cake sticking.
- Whisk together the chocolate cake mix, water, vegetable oil, and eggs in a bowl until the batter is smooth.
- Pour that rich batter into the prepared pan and bake for 25-30 minutes until a toothpick inserted in the center comes out clean.
- Allow the cake base to cool completely in the pan. Trust me, if it's even slightly warm, your ice cream will turn into a puddle.
- Press the cooled cake base firmly into the bottom of the springform pan Note: This creates a solid foundation for the heavy layers.
- Take your chocolate ice cream and let it soften for a few minutes. Spread it evenly over the cake layer, smoothing the top with your offset spatula.
- Sprinkle the crushed chocolate wafers evenly across the chocolate ice cream layer until the surface is fully covered.
- Spread the slightly softened vanilla ice cream over the wafer layer, smoothing it all the way to the edges of the pan.
- Pop the whole thing in the freezer for at least 6 hours or overnight until the cake feels firm to the touch.
- Beat the cold heavy whipping cream, powdered sugar, and vanilla extract until stiff peaks form. Spread this velvety topping evenly over the frozen cake.
Chef's Tip: To get a professional look, use a fork to create "swirls" in the whipped cream topping before serving. Also, try freezing your mixing bowl for 10 minutes before whipping the cream to get more volume.
Solving Common Cake Problems
Even with an Easy Ice Cream Cake Recipe, things can go sideways. Usually, it's a temperature issue.
Fixing Soggy Cake Bases
If your cake layer feels mushy, it's usually because the ice cream melted into the crumb during assembly. According to King Arthur Baking, ensuring a complete cool down of baked goods is key to maintaining structure. To fix this, always freeze the cake base for 20 minutes before adding the first ice cream layer.
Stopping Ice Cream Slump
When the ice cream doesn't stay put and slides during slicing, it's often because it was too soft when spread. The ice cream should be "spreadable" but not "liquid." If it's too soft, put it back in the freezer for 10 minutes.
Preventing Whipped Cream Collapse
If your topping is weeping or sliding off, you might have over beaten the cream or used cream that wasn't cold enough. For better stability, you can check out Serious Eats for tips on stabilizing cream with a bit of gelatin or cornstarch.
| Problem | Root Cause | Solution |
|---|---|---|
| Cake sticks to pan | No parchment paper | Use parchment and grease the sides well |
| Layers are blurry | Ice cream was too melted | Freeze each layer for 30 mins before adding the next |
| Topping is grainy | Over beaten cream | Stop mixing the second stiff peaks form |
Common Mistakes Checklist
- ✓ Cake base is 100% cold before layering
- ✓ Springform pan sides are greased
- ✓ Ice cream is slightly softened, not melted
- ✓ Whipping cream is ice cold before beating
- ✓ Cake froze for at least 6 full hours
Fun Flavor Twist Ideas
Once you've nailed the base Easy Ice Cream Cake Recipe, you can start playing with the flavors. The beauty of this build is that it's basically a giant canvas for sweets.
If you want something more indulgent, try adding a layer of Non Cook Cookie Dough between the chocolate and vanilla ice cream. It adds a chewy, salty sweet contrast that is absolutely insane.
For a different vibe, you can swap the chocolate cake mix for a vanilla one and use strawberry ice cream. If you're hosting a kids' party and want something slightly lighter, you could look into a healthy smash cake for the birthday baby, while the adults enjoy this decadent version.
Decision Shortcut: If you want a "Death by Chocolate" vibe → Use chocolate cake, chocolate ice cream, and fudge drizzle. If you want a "Neapolitan" style → Use vanilla cake, strawberry ice cream, and chocolate ice cream.
If you want a "Crunchy Feast" → Double the chocolate wafers and add crushed peanuts.
Freezing and Storage Rules
Since this is a frozen dessert, you have to be careful with how it handles.
Storage Guidelines Keep the cake in the freezer in the springform pan until you're ready to serve. Once you remove the ring, cover the cake with plastic wrap or store it in an airtight container. It will stay fresh in the freezer for up to 2 months.
After that, you might notice some freezer burn on the whipped cream, which ruins the velvety texture.
Zero Waste Tips If you have leftover cake batter, don't toss it! Pour it into a muffin tin and bake small chocolate cupcakes. If you have extra whipped cream, fold it into fresh berries for a quick breakfast treat.
Any leftover chocolate wafers can be tossed into a smoothie or used as a topping for vanilla ice cream.
Best Ways to Serve
To get those clean, professional slices, you need a trick. Dip a long, sharp knife in hot water and wipe it dry between every single cut. This slices through the frozen layers like butter and prevents the ice cream from smearing into the cake base.
Serve each slice with a handful of fresh raspberries or a drizzle of warm chocolate ganache. The contrast of the hot sauce and the freezing cake is a total game changer. For a more viral presentation, top the cake with whole macarons or fresh strawberries and a dusting of powdered sugar.
Trust me, this Easy Ice Cream Cake Recipe is the kind of dessert that makes people ask for the recipe before they've even finished their first piece. It's rich, it's cold, and it's exactly what a massive sweet tooth needs. Enjoy!
Recipe FAQs
Can I use a regular cake pan instead of a springform?
No, a springform pan is highly recommended. The removable sides allow you to lift the frozen cake out without damaging the distinct layers.
Is it true I can add the ice cream while the cake is still warm?
No, this is a common misconception. You must allow the cake base to cool completely in the pan to prevent the ice cream from melting into the sponge.
How to prevent the ice cream from melting during assembly?
Soften the ice cream slightly before spreading. This allows you to smooth the layers quickly with an offset spatula without leaving the cake at room temperature for too long.
Can I make this cake the day before?
Yes, it is actually preferable. Freezing the cake overnight ensures it is completely firm, which makes the final whipping cream topping easier to apply.
How to get clean slices when cutting the cake?
Dip a sharp knife in hot water and wipe it dry between every single cut. This prevents the ice cream from sticking to the blade and keeps the layers sharp.
Is it true the cake only needs to freeze for an hour?
False. The cake requires at least 6 hours or overnight to set properly so it does not collapse when the springform pan is released.
Can I use a different base instead of a cake mix?
Yes, any firm cake base works. If you enjoyed mastering the structure of our almond flour cookies, you can apply similar fat-to-flour ratio logic to a homemade cake base for a denser crust.
Easy Ice Cream Cake

