Homemade Mini Muffins: Moist and Velvety
- Time: Active 8 minutes, Passive 11 minutes, Total 19 minutes
- Flavor/Texture Hook: Buttery golden crust with a velvety, melt in-the mouth center
- Perfect for: School lunchboxes, viral brunch boards, or satisfying a massive sweet tooth
- Creating the Best Texture for Mini Muffins
- Breaking Down the Essential Mini Muffins Numbers
- What You Need for These Gold Little Bites
- The Gear That Makes Mini Muffins Pop
- Step by Step to the Perfect Mini Muffin
- The Chemistry of a High Rise
- Common Pitfalls When Baking Mini Muffins
- Creative Ways to Tweak Your Mini Muffins
- The Best Ways to Store Mini Muffins
- Serving Tips for Your Fresh Mini Muffins
- Recipe FAQs
- 📝 Recipe Card
Creating the Best Texture for Mini Muffins
Before we even touch a whisk, we have to talk about the sheer nostalgia of these tiny treats. In the grand tapestry of baking history, muffins actually started as yeasted, griddle cooked cakes in the UK before migrating to America and transforming into the quick bread "Little Bites" we obsess over today.
There is something culturally iconic about the mini muffin; it represents our fast paced, grab and-go snack culture, but making them at home brings back that soul warming aroma that a silver plastic pouch simply cannot replicate.
Whenever I pull a tray of these out of the oven, the first thing I notice is the contrast. You get that slight resistance from the golden, domed top almost a "shatter" if you sprinkle a little extra sugar on there followed immediately by a center so soft it practically disappears.
I used to think I needed fancy bakery equipment to get that high domed look, but it turns out it’s all about the ratio of moisture to heat.
We're going for a viral worthy snack that looks like it came from a professional pastry case but takes less than 20 minutes from start to finish. I’ve made the mistake of over mixing or using too much liquid before, resulting in "sad, flat discs" instead of muffins little bites.
Trust me, once you see that first batch spring back in the tin, you'll never go back to the store-bought stuff.
Breaking Down the Essential Mini Muffins Numbers
To get these right every single time, you need a quick roadmap of what to expect. While most people reach for the oven, some of you might be tempted to try alternative methods for that "crispy edge" fix. Here is how the classic bake compares to other common kitchen techniques.
| Method | Time | Texture | Best For |
|---|---|---|---|
| Standard Oven | 11 minutes | Domed tops, soft crumb | Traditional bakery results |
| Stovetop (Dutch Oven) | 20 minutes | Crispy bottoms, denser | Rustic, "no oven" situations |
| Air Fryer | 8 minutes | Extra crunchy exterior | Quick single serving fixes |
Getting the temperature right is non negotiable. If you bake these at a low temperature, they will spread like a cookie rather than climbing like a cake. We need that 400°F (205°C) blast to force the leavening agents into action immediately.
This creates the internal pressure needed to push the batter upward before the crust sets.
What You Need for These Gold Little Bites
The chemistry here is actually quite simple once you see how the ingredients play together. I’m a massive sweet tooth, so I’ve tweaked this to ensure the sweetness isn't just one note; it’s balanced by the tang of the yogurt and a hit of sea salt.
Component Analysis
| Ingredient | Science Role | Pro Secret |
|---|---|---|
| Greek Yogurt | Provides acidity for lift | Use full fat for maximum moisture |
| Cornstarch | Interferes with gluten formation | Weigh it for consistent tenderness |
| Baking Powder | Chemical leavening agent | Ensure it's fresh for high domes |
| Neutral Oil | Stays liquid at room temp | Avocado oil adds a buttery richness |
The Essential Grocery List
- 190g All purpose flour: The structural backbone. Why this? Provides enough protein to hold the muffin's dome shape.
- 15g Cornstarch: Our secret weapon. Why this? It softens the flour's protein, creating a "cake flour" effect.
- 150g Granulated sugar: For sweetness and browning. Why this? It helps caramelize the edges at high heat.
- 10g Baking powder: The lift. Why this? Creates the carbon dioxide bubbles that make them fluffy.
- 2g Sea salt: The flavor enhancer. Why this? Brightens the chocolate and cuts through the yogurt's tang.
- 120g Full fat Greek yogurt: Moisture and acid. Why this? The thick texture prevents the batter from being too runny.
- 1 large Egg: The binder. Why this? Adds fat and structure so the muffins don't crumble.
- 80ml Neutral oil: For a long shelf life. Why this? Oil coats flour proteins better than butter, keeping them soft.
- 60ml Whole milk: For hydration. Why this? Thins the batter just enough to make it scoopable.
- 10ml Pure vanilla extract: The aromatic base. Why this? Essential for that classic bakery style scent.
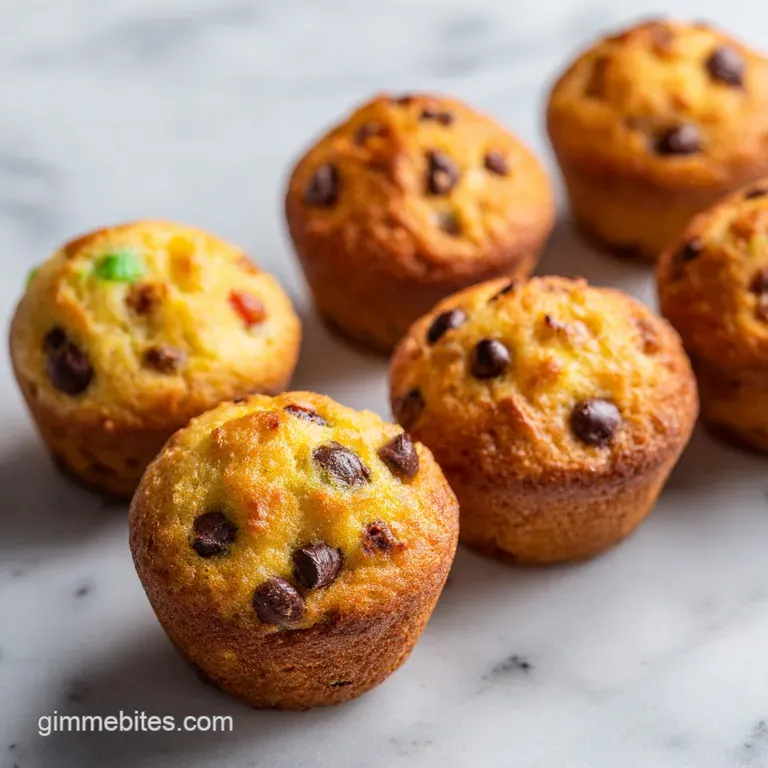
- 90g Mini semi sweet chocolate chips: The "fun" factor. Why this? Mini chips ensure chocolate in every single bite.
The Gear That Makes Mini Muffins Pop
You don't need a massive arsenal of tools, but a few specific items will make your life much easier. First and foremost, a 24 count mini muffin tin is essential. If you use a standard sized tin, the cook times will be completely off, and you'll lose that "little bite" charm.
I also highly recommend using a small cookie scoop (about 1 tablespoon capacity). This ensures every muffin is the exact same size, which means they all finish cooking at the same second.
If you’re manually spooning batter, some will be overcooked and dry while others are still gooey in the middle. Finally,, a high-quality whisk and a silicone spatula are your best friends here to prevent over mixing, which is the number one killer of a velvety crumb.
Step by step to the Perfect Mini Muffin
Now we get to the actual baking. This process is fast only 19 minutes total so make sure your oven is fully preheated before you even start mixing the wet ingredients.
- Heat things up. Preheat your oven to 400°F (205°C). Liberally grease your 24 count tin with butter or non stick spray. Note: Don't miss the corners; mini muffins love to stick.
- Whisk the dry. In a large bowl, combine the flour, sugar, cornstarch, baking powder, and sea salt. Whisk until no lumps remain to ensure even rising.
- Emulsify the wet. In a separate medium bowl, whisk the egg, Greek yogurt, neutral oil, milk, and vanilla. Whisk until smooth and emulsified; you don't want to see any oil streaks.
- The gentle merge. Pour the wet mixture into the dry. Use a spatula to fold the mixture just until no flour streaks remain. Note: Stop immediately when the flour disappears to keep them tender.
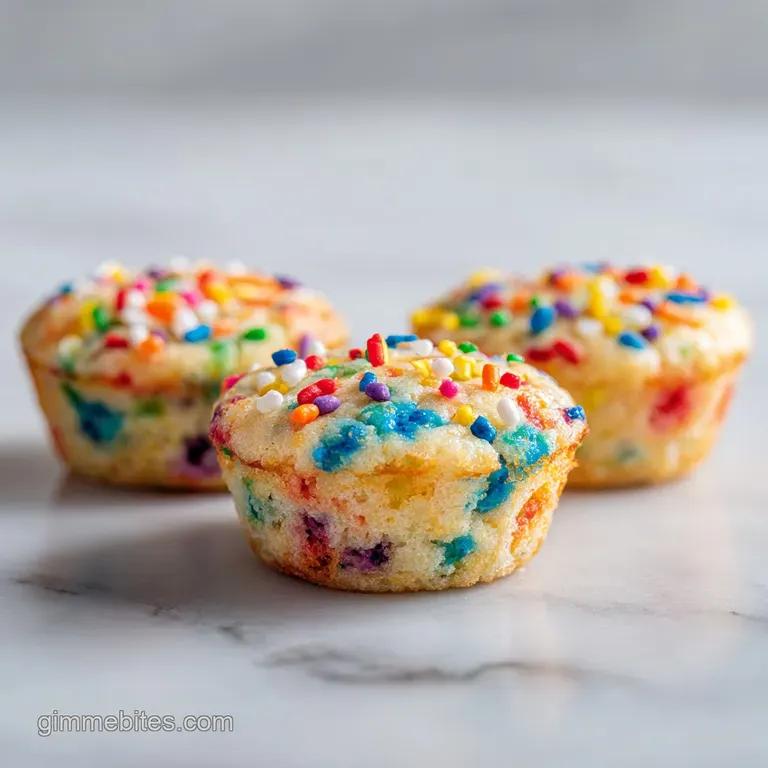
- Add the sparkle. Gently fold in the mini chocolate chips or blueberries.
- Fill the tins. Use your cookie scoop to divide the batter. Fill each cavity nearly to the top for those signature high domes.
- The over high heat bake. Bake at 400°F (205°C) for 11 minutes. Bake until the tops are domed and spring back when touched.
- The cool down. Let them sit in the tin for 5 minutes. Transfer to a wire rack so the bottoms don't get soggy.
The Chemistry of a High Rise
Understanding why this works will turn you into a better baker instantly. The interaction between the ingredients is what creates that specific "bakery" feel.
- Acid Base Reaction: The Greek yogurt provides lactic acid, which reacts with the baking powder. This creates an immediate surge of gas.
- Starch Gelatinization: The cornstarch absorbs liquid and sets quickly, providing a delicate structure that doesn't feel "bready."
- Thermal Shock: Starting at 400°F (205°C) causes the air pockets to expand rapidly before the exterior sets, creating the dome.
- Moisture Retention: Using oil instead of butter means the muffins stay soft even when cold. For a similar moisture heavy profile, you might want to see how I handle my Zucchini Carrot Muffins.
Common Pitfalls When Baking Mini Muffins
Even the simplest recipes can go sideways if you aren't careful. The most common issue I see is the "tough muffin syndrome," which usually happens because someone got a little too aggressive with the whisk.
Why Your Muffin Tops Are Flat
If your muffins look like small pancakes, your oven temperature might be too low, or your baking powder might be expired. Always check the date on your leavening agents! Another culprit is over mixing; if you develop too much gluten, the air bubbles can't push the heavy batter upward, so they just expand sideways.
| Problem | Root Cause | Solution |
|---|---|---|
| Muffins are tough | Over mixing the batter | Fold by hand only until flour disappears |
| Sticking to pan | Not enough grease/oil | Use a pastry brush to coat every edge |
| Dry and crumbly | Over baking | Remove at 11 minutes even if they look pale |
Common Mistakes Checklist
- ✓ Preheat the oven for at least 15 minutes before baking.
- ✓ Use room temperature yogurt and eggs for better emulsification.
- ✓ Fill the muffin cups at least 3/4 full to get a decent dome.
- ✓ Don't let the batter sit on the counter; get it in the oven immediately once mixed.
Creative Ways to Tweak Your Mini Muffins
Once you have the base down, the variations are endless. I love a good copycat recipe, and this base is perfect for replicating those viral snack packs. If you want to lean into the "protein" trend, you can look at how I adapt recipes like my Banana Protein Muffins for a different macro profile.
If you want X, do Y
- If you want a "Cinnamon Toast" version: Add 1 tsp of cinnamon to the dry mix and dip the warm tops in melted butter and cinnamon sugar.
- If you want a "Lemon Poppyseed" feel: Add 1 tbsp of lemon zest and 1 tsp of poppyseeds, replacing the chocolate chips.
- If you want a "Crunchy Top": Sprinkle coarse sparkling sugar or turbinado sugar over the batter before it hits the oven.
| Original Ingredient | Substitute | Why It Works |
|---|---|---|
| Greek Yogurt | Sour Cream | Similar acidity and fat. Note: Slightly richer flavor profile. |
| Neutral Oil | Melted Butter | Adds incredible flavor. Note: Muffins may be slightly firmer when cold. |
| Mini Chocolate Chips | Wild Blueberries | Provides a tart contrast. Note: Toss in flour first to prevent sinking. |
The Best Ways to Store Mini Muffins
Mini muffins are the kings of meal prep. Because they are so small, they lose moisture faster than a giant muffin, so you have to be smart about how you keep them.
Storage Guidelines:Countertop: Keep them in an airtight container for up to 3 days. I like to throw a piece of paper towel in the bottom of the container to absorb any excess moisture and keep the tops from getting "sticky." Freezer: These are the ultimate freezer snack!
Flash freeze them on a baking sheet for an hour, then toss them into a zip top bag. They stay fresh for up to 3 months. Just pop one in a lunchbox in the morning, and it’ll be thawed by noon.
Zero Waste Tip: If you happen to have a batch that went a little dry (it happens!), don't toss them! Break them up and use them as a base for a mini bread pudding. Or, toast the halves in a pan with a little butter and serve them over vanilla ice cream. It's a massive sweet tooth's dream.
Serving Tips for Your Fresh Mini Muffins
When it comes to serving, presentation is half the fun. These are inherently "cute," so lean into that. They look stunning on a tiered tray for a baby shower or a brunch spread.
If you're serving these for a party, I love making a "dip station." A small bowl of maple butter, some strawberry jam, or even a bit of sweetened cream cheese makes these feel like a gourmet experience. For a balanced breakfast, pair two or three of these with a hard boiled egg and some fresh fruit.
They provide that hit of sweetness without being an overwhelming "dessert" first thing in the morning.
Remember, the "Little Bites" magic comes from the fact that they are easy to eat. Keep them simple, keep them small, and keep them coming! Once people realize how much better the homemade version is, they'll be gone in seconds.
Recipe FAQs
What are those tiny muffins called?
They are officially called mini muffins. This term simply refers to their smaller size, typically baked in a 24-count pan rather than a standard 12-cup tin.
Were there 5 muffins in Little Bites?
No, this is a common misconception. While store-bought snack packs vary by brand, our recipe is designed to yield exactly 24 mini muffins per batch.
Are Little Bites real muffins?
Yes, they are essentially miniature versions of standard muffins. They follow the same quick bread chemistry, relying on baking powder for lift and an emulsified base of yogurt, egg, and oil for structure.
Are little bites muffins considered junk food?
Not necessarily, it depends on the ingredients. By making them at home using wholesome components like Greek yogurt and controlled sugar levels, you can create a healthy honey sweetened version that offers much more nutritional value than processed alternatives.
How to keep mini muffins from sticking to the tin?
Liberally grease your 24-count mini muffin tin with non-stick spray or butter before adding the batter. Ensure you coat the bottom and the sides of every cavity to prevent the dome from anchoring to the pan during the bake.
How to tell when mini muffins are done baking?
Check if the tops are domed and spring back when lightly touched. They will take 11-13 minutes at 400°F; if they don't spring back, give them another minute in the oven.
How to avoid tough, dense mini muffins?
Fold the wet and dry ingredients together just until no streaks of flour remain. Over mixing develops too much gluten, which creates a rubbery texture instead of a tender crumb.
Homemade Mini Muffins

